Sunday, September 9, 2012

Things to Make With Your Homemade Yarn!

Well, I hope everyone is having a blessed Sunday! Here are two of the things I have made with my Homemade yarn. One is a bracelet. How I made it was did a basic single stitch and made two to three rows depending on how thick you want your bracelet. I then tied some thin leather on one end in a loop. On the other end I sewed a big button. Make sure you loop is big enough for your button but not two big that it comes out too easily.

Next, I made a pot holder. I used the same principal as the bracelet. I just added more rows. I kept adding till the pot holder was as big as I wanted it. I didn't have a good picture of the pot holder. The picture wasn't very clear. There are other things you can make with your yarn. These are just the two that I have done. If you do not know how to crochet look it up on youtube! They have some really good videos to help you learn or refresh your memory! I hope you like these ideas! Remember Christmas is just around the corner! Till next time hope you have a blessed day!


Monday, September 3, 2012

Homemade Yarn Using Old T-Shirts

It seems like ages since I last posted! I have done a lot of canning and sewing. Will post more about those in the days to come. I wanted to share how to make yarn using an old t-shirt.
First, find an old t-shirt.

Next, you are going to cut the bottom hem of the t-shirt. You don't need this. 

Now, you are going to cut 1/2 inch all the way around. It does not have to be exact just try to keep as close as you can. Keep cutting until you get to where the arms are. 


Now, you are going to stretch the fabric and start rolling into a yarn ball.


And Voila' you now have yarn! I will post some crafts to make with your new yarn in upcoming days! Hope you enjoy! Till next time have a blessed day!


Sunday, June 3, 2012

Canning Salsa

Well it is that time again....Canning! I love to put up fresh produce in the summer to have during the winter. One thing my family loves is Salsa. There are a lot of recipes out there. This to me is the easiest, fastest, and it taste great! Here it is:
You are going to need 6 lbs. of fresh tomatoes (about 18 medium) or 6 cans (14.5 oz each) petite diced tomatoes. 1/2 cup white distilled vinegar. 1 pouch Mrs. Wages Medium Salsa Mix. (yes, I know I cheated! Heheheh!)

First wash fresh tomatoes. Then scald them for 3 minutes in boiling water.
Dip into cold water. Cut out cores, remove skins and chop coarsely. If using canned tomatoes, do not drain liquid.


While you are scalding tomatoes, you need to prepare your jars. You should use sterilized pint canning jars. I just put my pint canning jars in a pot of water and bring them to a boil and keep them warm. The rings and lids I do the same way. (In a separate pot.)
Here is a pic of my rings and lids. Forgot to take pic of my jars. Sorry!


Combine tomatoes, vinegar, and Salsa Mix in a large pot and bring to a boil. Stir occasionally. Reduce heat and simmer 10 minutes. Stir occasionally. Salsa is Ready!


Pour hot salsa into clean, sterilized pint canning jars, leaving 1/2 inch head space. Cap each jar when filled. Process in boiling water bath for 40 minutes. (You fill a pot with water bring it to a rolling boil. put your jars in using a jar holding or other tool to keep the jars off the bottom. Make sure water is over the tops of the jars. Bring the water to a boil again. Then put timer on for 40 minutes.) Take jars out and test jars for airtight seals according to manufacturer's directions. Store up to 1 year. If jars do not completely seal, refrigerate and consume within one week. Once jars have cooled and they are sealed. The lid with not make a popping sound when you push it in the center It will be pushed in. Remember to label your salsa and put the date. Voila' Salsa! Hope you enjoy it! 

Saturday, March 24, 2012

Kale Chips

Yesterday was my youngest son's 12th birthday. Boy how time flies! He wanted a crawfish boil for his birthday so that is what we are doing today. My youngest son is also one of the pickiest eaters that I know. If it is a vegetable you can bet he is not going to eat it. This all changed a few days ago when I made Kale Chips. You know that stuff that looks like lettuce! He actually ate them. Not only did he eat them he asked for some in his lunch. I almost fainted. So I decided to post how to make Kale Chips in case you have some picky eaters of your own! ;)  It is best to make Kale Chips with fresh Organic Kale. The reason is Kale is one of those vegetables that can have high pesticide residue.

Kale Chips:

First, preheat your oven to 400 degrees. Next, you will need 1 large bunch of Kale. You will need to remove the hard stems and tear the leaves into "chip" size. Then place them in a bowl.


Then, with your hands massage 1 Tablespoon Olive oil and 1/2 teaspoon of Sea Salt into the leaves. (Now I made some with just Sea Salt. I also made some with Cumin, Garlic, and Sea Salt. Then some with Chili Powder and Sea Salt. Just play around and see which ones you like best.)


You will need to line a cookie sheet with parchment paper and put the kale on the cookie sheet. Make sure the kale does not overlap. You need to just have a single layer so they can get crispy like chips.

Put the kale in the oven for 8 to 10 minutes. Check after 8 minutes to see if they are slightly brown and crispy. Take them out and leave on pan for two minutes. And Voila' there you have it, Kale Chips. Hope you enjoy it. Till next time hope you have a blessed day!


Sunday, February 26, 2012

Homemade Laundry Detergent

Well the weather here is so crazy. Hot one day, cold the next. Can not wait until spring and summer. I hope everyone is having a peaceful Sunday. I made another batch of homemade laundry detergent. I have been using my homemade detergent for almost 9 months now. And I LOVE IT! It is so easy and cost so little. Below is how I make mine.
You will need:
* 1 bar of Zote or Fels Naptha Soap ( you can also use homemade soap or Dr. Bonner's)
* 1 Cup of Arm and Hammer Washing Soda (NOT baking soda)
* 1/2 Cup of Borax
* Hot Water


First place 4 cups of HOT water in a sauce pan and grate your bar of soap into the pan. Stir over medium high heat until the soap has dissolved.


Fill a 5-gallon bucket half full with HOT water. Add melted soap mixture, washing soda, and borax. Stir well until powder is dissolved.


Fill to the top with HOT water. Let it sit overnight to thicken. 


Stir in the morning and start to use. I fill my old detergent bottle with the detergent. I just shake it and pour 1 to 2 capfuls. (1/2 to 1 cup) All washers are different so experiment to see what is best for you. This is okay to use in HE washers. I know this because I have one. Well, voila' there you have it homemade laundry detergent. I hope you enjoy. Till next time hope you have a blessed day! 


Saturday, February 11, 2012

Homemade Fire Starters

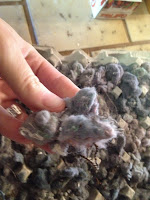
I hope everyone is having a great February! I wanted to show you what I did today, besides washing, drying, folding clothes and cleaning house! I made homemade fire starters. What I did was got some cardboard egg cartons. Then I started saving all my dryer lint. Yes, you read it right dryer lint. Just pack the lint tight in the egg cartons. (The only lint I don't use is the lint from my son's work clothes. He works as a mechanic. So sometimes he has gas and oil on his clothes. Not good for making fire starters.)


Once you have your lint packed into your egg cartons, you need to add wax. You can use paraffin wax that you can get at your local grocery store or you can use old candles that you don't use any more. Just melt the waxes.


I used a mixture of both the paraffin wax and some old candles. Once your wax is melted you can use the pan to pour the melted wax or use a pyrex measuring cup to pour the wax over the lint.


After you have poured wax all over the lint and coated it. Let it dry for 12 to 24 hours. Then cut them as big or little as you want them. Use them just as you would fire starters. 


And volia' homemade fire starters! Hope you enjoy! Till next time have a great day!

Sunday, January 22, 2012

Homemade Scarf

Hope everyone is having a blessed Sunday! I have been seeing this homemade scarf all over the internet. Sooooo, I decided it was time to give it a try! Like what could go wrong it is just an old t-shirt?!? Right?!?
First of all you find or buy a t-shirt in whatever color or print you want. Lie the t-shirt out on a table or counter.

Next, you cut two inch stripes all the way up till you get to the armpits. You need a sharp pair of scissors. Don't worry if your lines are not exactly straight. That just adds flare! ;) 


Then, you are going to take your circles and wrap them around your hand four times to make four circles.


Now, You are going to cut some two inch strips from the remaining shirt. I used the sleeves. Use these to tie the circles together. Trim off the excess from the tie.


Now, Voila' your very own scarf! Hope you have fun with this one! Till next time have a blessed day!